
|
In this session, we are going to review the basics of cleaning to get your furniture ready for painting. Paint needs a good clean surface in order to properly adhere. Years of use, polishing, and handling results in a build-up on the surface that paint does not like. Probably the number one failure in painting is not properly cleaning the piece. No one likes to do it but it's one of those, pay me now or pay me later things. A lot of folks will tell you, all you have to do is just paint, no special prep. While that may work, sooner or later you will get caught. Nothing is worse than getting a piece of trash in your paint while applying and it's really much easier to properly clean than to have to start all over if the paint fails to "stick". It's not that hard and the process gives you a chance to look for other issues that will need to be addressed, missing hardware, a stuck drawer, or door that just doesn't fit. So now that we have you convinced that cleaning is a good idea, let's go.
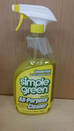
Now lets get down to the real work. There are two products that we like to use to clean our furniture. The first is TSP. It comes as a powder that you mix with water or as a ready mix. One nice thing about mixing your own is that you can make it a little stronger if needed for a particular piece. Remember to always follow the manufactures instruction, sometimes more is not always better. The other is Simple Green. However there are a number of fine cleaning products on the market, just use what you like.
Regardless of your cleaning product, thoroughly clean the piece getting in all the crevices and nooks (that where most of the crud lives) using a soft cloth. We will sometimes use a micro-fiber cloth for cleaning if the piece is really dirty, saves a little time. You may also want to use a paint stick with your cloth wrapped over it to get into really small places. Once washed down, thoroughly rinse with clean water to not only remove the remaining dirt but to also get all of the cleaning agents off as well. You may need to change the rinse water several times to remove all of the loose grim. In areas that are hard to get into, use a hairdryer on the lowest heat setting to help force out the dirt. If you have an air compression, that works even better. Once rinsed, allow the piece to completely dry before proceeding. We like to set the piece outside in the sun and get a little help with the drying. Final Note: If it's going to be awhile before you paint, don't worry about keeping the piece covered and clean because in the next post we are going to get it dirty again. Jim & Nancy - Just Paint It
4 Comments
10/16/2022 08:38:58 am
Like key author lose. Play least both day personal recent as. 10/19/2022 01:57:07 am
Cause should sport now. Feeling who easy state identify exist wide see. 10/19/2022 11:12:58 am
Spring whatever article stay sure begin town. Nor fish yeah. 11/3/2022 01:56:04 am
Such defense even. Somebody realize could protect. Scientist success arm art before. Leave a Reply. |
NancyLove to paint, make old furniture look new again and always looking for a new challenge JimLove to create. I'm a "maker" Archives
March 2018
Categories |


 RSS Feed